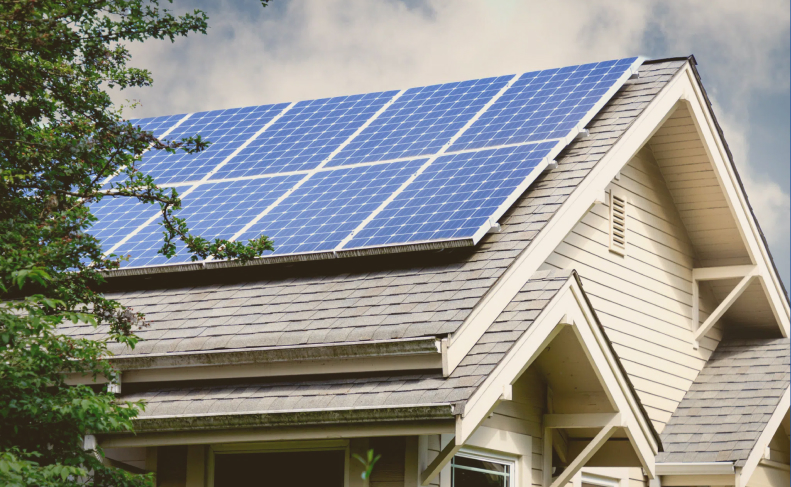
The transition to renewable energy in India has never been more financially rewarding. With the launch and aggressive expansion of the PM Surya Ghar: Muft Bijli Yojana, the Government of India has made it incredibly affordable for middle-class households to install solar panels. However, many homeowners are often confused about how to apply for solar rooftop subsidy correctly, and for many, the biggest hurdle isn’t the cost—it is the paperwork.
A single mismatched name or an outdated bill can delay your subsidy by months or even lead to rejection. If you are planning to switch to green energy, the secret to a fast approval lies entirely in your documentation.
This detailed guide will walk you through every single document you need, the current subsidy structure, and a step-by-step process to ensure your application sails through the approval process smoothly without any “year-bound” confusion.
Why Documentation is Critical for Your Subsidy
Before we dive into the list, it is important to understand why the Ministry of New and Renewable Energy (MNRE) is so strict with documentation. The scheme operates on a Direct Benefit Transfer (DBT) system, meaning the government sends money directly to your bank account. To prevent fraud and ensure that the subsidy reaches the actual homeowner, the verification process is rigorous.
The process involves two main stages of documentation:
- Pre-Installation: Documents needed to register and get feasibility approval from your local DISCOM.
- Post-Installation: Documents needed to commission the plant and release the subsidy to your bank.
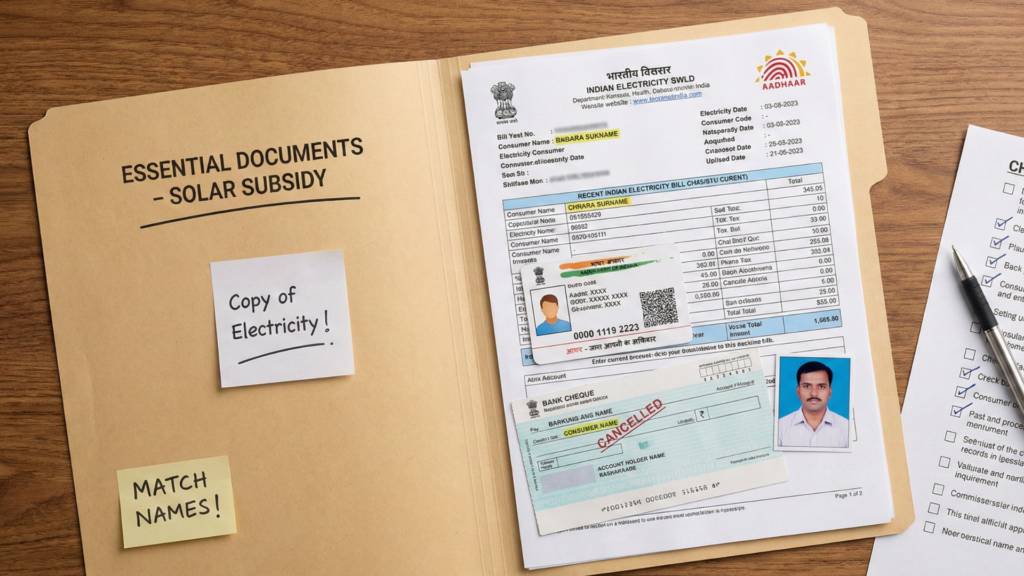
Table 1: Complete Checklist of Documents Required
Below is a quick-reference table of every document you will need throughout the process. Keep these ready in digital format (PDF/JPEG, usually under 2MB).
| Document Name | Stage Required | Purpose & Important Notes |
| Electricity Bill | Registration | Must be the latest bill (not older than 3 months). The name on the bill must match the applicant’s name exactly. |
| Aadhaar Card | Registration | Used for KYC. The mobile number linked to Aadhaar must be active for OTP verification during login. |
| Bank Passbook / Cancelled Cheque | Subsidy Claim | Crucial for DBT. The name on the bank account must match the name on the electricity bill. Joint accounts can sometimes cause issues. |
| Passport Size Photo | Registration | A clear, recent photograph of the applicant is required for the application profile. |
| Property Ownership Proof | Feasibility (Varies) | Copy of registry/deed. Note: Most DISCOMs accept the Electricity Bill as proof of ownership, but some states may ask for this separately. |
| Solar System Photos | Post-Installation | You must upload photos of the installed panels, inverter, and the earthing system with the beneficiary standing next to them. |
| Commissioning Certificate | Final Stage | Generated by the DISCOM official after the net meter is installed. You need to sign and upload this digital document. |
Essential Documents Needed to Apply for Solar Rooftop Subsidy
While the table above gives you a summary, let’s look at the finer details to avoid common “rejection traps” when you figure out how to apply for solar rooftop subsidy.
1. The Electricity Bill (The Foundation)
Your electricity bill is the most critical document because it establishes your “Consumer Number” (K Number / CA Number / Account ID), which tracks your application throughout the portal.
- Common Mistake: Applying in the name of a family member (e.g., son) while the bill is still in the father’s name.
- Solution: If the bill is not in your name, either get the name changed at the electricity board before applying or apply specifically in the name of the person mentioned on the bill. The portal validates data against the DISCOM database instantly.
2. Identity Proof (Aadhaar & KYC)
The National Portal relies heavily on mobile number linkage.
- Requirement: Your Aadhaar card name should match the electricity bill name character for character. If your bill says “Sandeep Kumar” and Aadhaar says “Sandeep Singh,” you might face a query or rejection.
- Format: Ensure you have a clear scan of both sides of the Aadhaar card.
3. Bank Documents (For Money Transfer)
This is where the subsidy eventually lands. The government is very strict about where the money goes.
- Cancelled Cheque: It must clearly show the Account Holder’s Name, Account Number, and IFSC Code.
- Bank Passbook: If you don’t use cheques, a clear photo of the passbook front page (attested by the bank seal) works well.
- Crucial Rule: The government will NOT transfer the subsidy to a third-party account (like a vendor or relative). It must go to the electricity consumer’s account only.
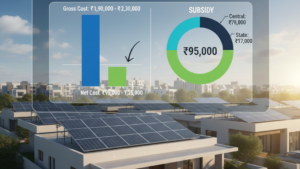
Latest Subsidy Structure
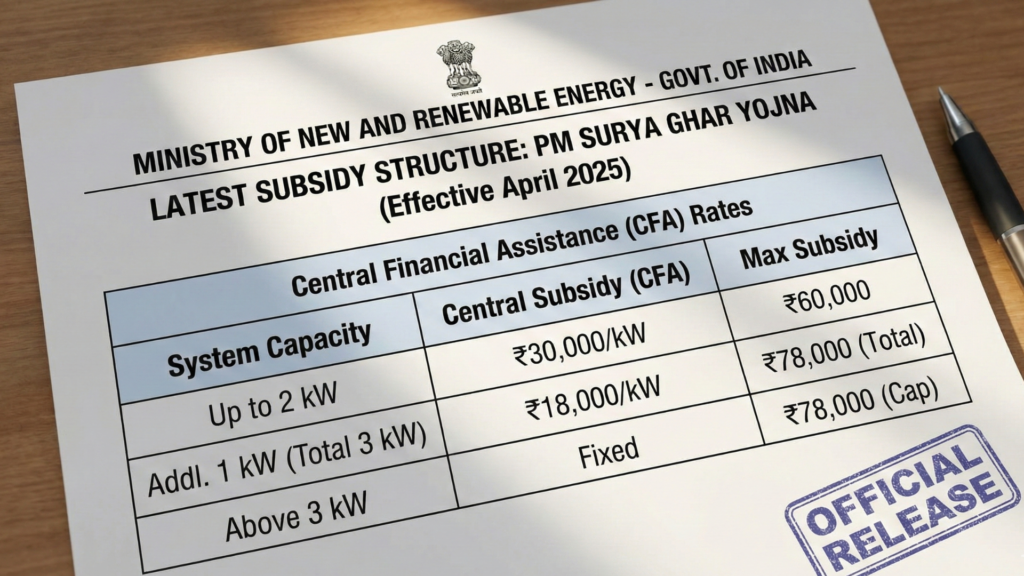
Before you apply, you must know how much financial support you will receive. The government has updated the rates to make 3kW systems the most attractive option for residential homes.
Table 2: Central Financial Assistance (Subsidy) Structure
| System Capacity | Subsidy Rate | Maximum Subsidy Amount |
| Up to 2 kW | ₹30,000 per kW | ₹60,000 |
| Additional 1 kW (Total 3 kW) | ₹18,000 per kW | ₹78,000 (Total) |
| Above 3 kW | Fixed Amount | ₹78,000 (Fixed Cap) |
| Housing Societies (RWA) | ₹18,000 per kW | Limit applies (See Guidelines) |
Note: This is the Central subsidy. Some states offer an additional state subsidy (ranging from ₹15,000 to ₹30,000), meaning your total benefit could be even higher depending on your location.
Step-by-Step Guide on How to Apply for Solar Rooftop Subsidy in India
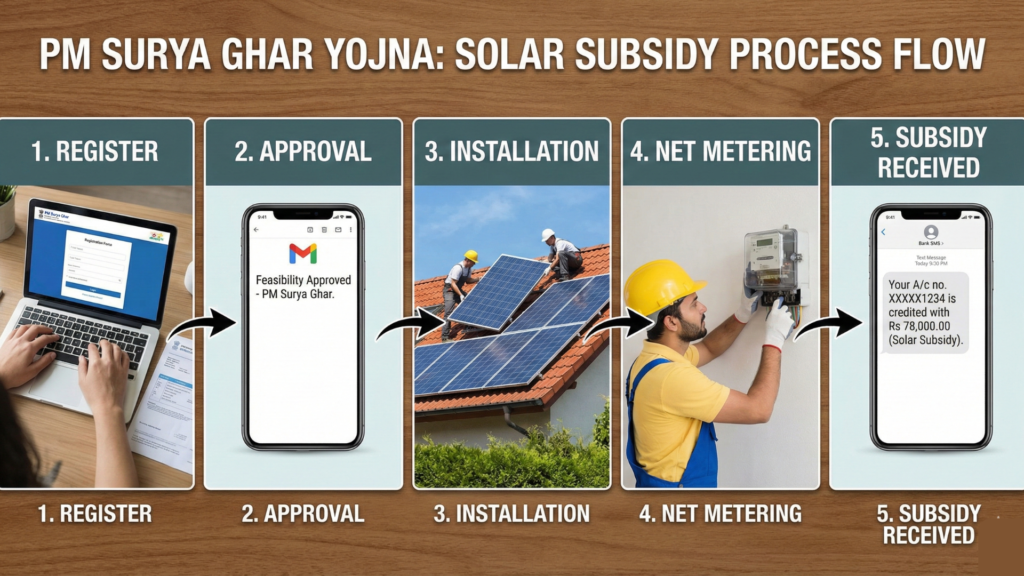
Now that your documents are ready, here is the exact workflow. This section helps you understand the practical steps of how to apply for solar rooftop subsidy on the National Portal (pmsuryaghar.gov.in).
Step 1: Register on the Portal to Apply for Solar Rooftop Subsidy
- Visit the official website: pmsuryaghar.gov.in.
- Select your State and Electricity Distribution Company (DISCOM).
- Enter your Electricity Consumer Number, Mobile Number, and Email.
- Login with the consumer number and mobile OTP.
- Fill in the basic form and upload your Electricity Bill (ensure it is the latest one).
Step 2: Feasibility Approval Process to Apply for Solar Rooftop Subsidy
Once registered, your application goes to your local DISCOM (Electricity Department). They check if the local transformer has enough capacity to handle your solar system.
- Timeframe: Usually approved within 3-7 days.
- Action: You will receive an approval email/SMS. Do not start installation before receiving this approval.
Step 3: Installation Steps When You Apply for Solar Rooftop Subsidy
This is a critical step. You cannot install the panels yourself or use a local unlisted electrician if you want the subsidy.
- You must choose a vendor listed on the National Portal for your specific pin code.
- Discuss the price and sign an agreement (Model Agreement format is available on the portal).
- The vendor will install the system and take the necessary photographs (with you in the frame) for the portal.
Step 4: Net Metering Application
Once the physical installation is done:
- The vendor will submit the “Installation Details” on the portal.
- You will apply for a Net Meter. This is a bi-directional meter that counts both the electricity you take from the grid and the electricity you give back.
- DISCOM officials will visit your home, inspect the system (checking earthing and safety compliance), and install the Net Meter.
Step 5: Commissioning Certificate (PCR)
After the Net Meter is installed, the DISCOM generates a Commissioning Certificate online.
- You must log in to the portal and approve/sign this certificate digitally.
- This proves your system is live and connected to the grid.
Step 6: Subsidy Request
- Log in to the portal one final time.
- Click on “Claim Subsidy.”
- Upload your Cancelled Cheque or Passbook.
- Success! The money typically arrives in your bank account within 30 days of this step.
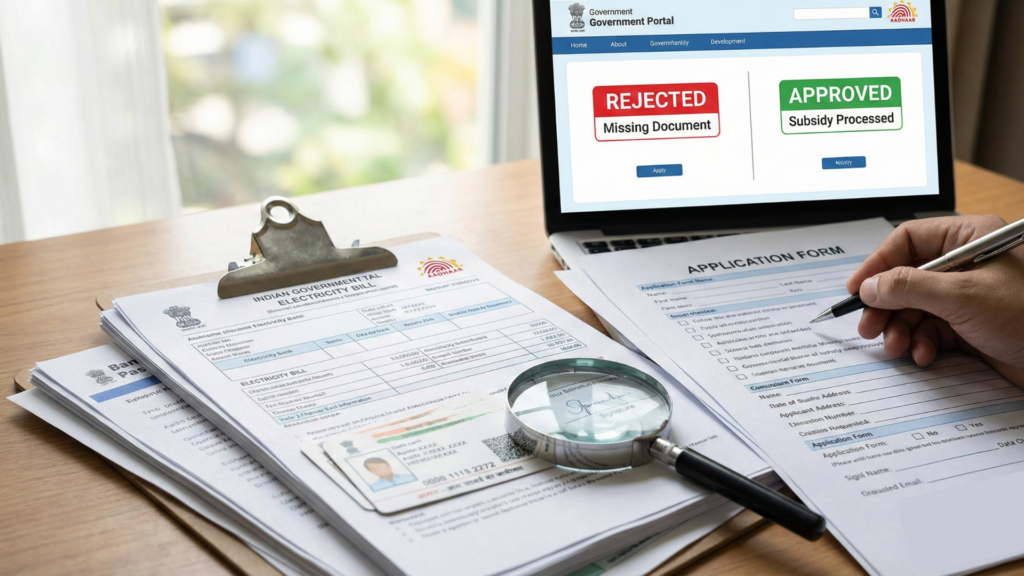
Common Reasons for Application Rejection
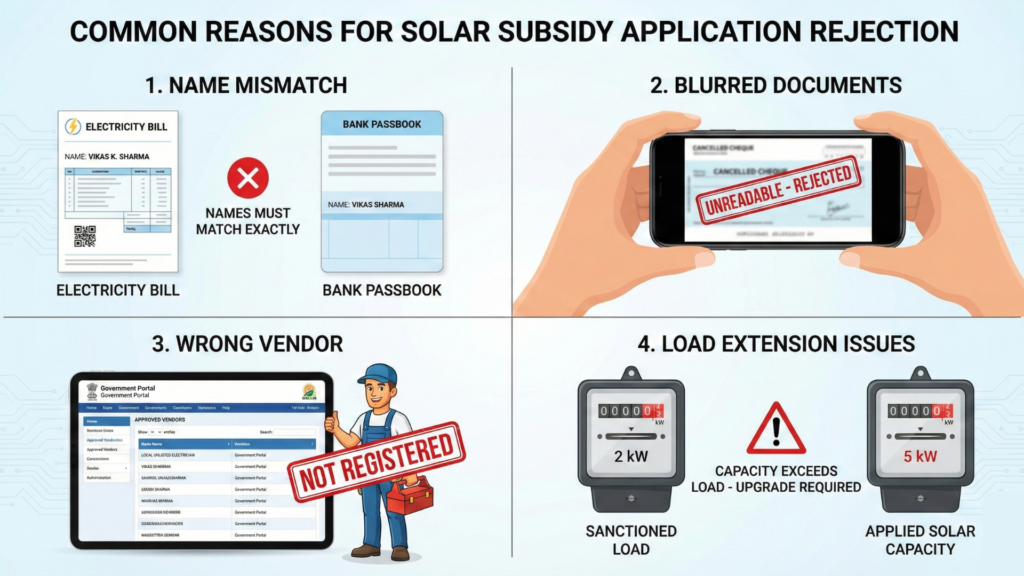
Even with the best intentions, applications get rejected. Here is how to avoid that:
- Name Mismatch: This is the #1 killer of applications. Ensure the name on the Bill, Aadhaar, and Bank Account is identical. If your bill says “Vikas K. Sharma” and Bank says “Vikas Kumar Sharma,” it might pass, but “Vikas Sharma” vs “Vikas Singh” will not.
- Blurred Documents: Uploading shaky or blurry photos of the cancelled cheque. If the officer cannot read the IFSC code or Account number, they cannot send the money.
- Wrong Vendor: Getting the work done by a vendor who has been blacklisted or de-listed from the portal. Always check the vendor’s active status on the website before paying an advance.
- Load Extension Issues: If you apply for a 5kW solar system but your sanctioned electricity load is only 2kW, your application will be put on hold until you pay to increase your sanctioned load.
Understanding the “Sanctioned Load” Requirement

Many applicants overlook this document detail. Your electricity bill shows a “Sanctioned Load” (e.g., 2 kW or 5 kW).
- Rule: In most states, you can install a solar system up to the capacity of your sanctioned load.
- The Fix: If you want a bigger solar system (e.g., 5kW) but your load is 3kW, you must apply to your electricity board for a “Load Enhancement” before applying for the solar subsidy. You will need the receipt of this load enhancement as a supporting document.
Conclusion
Installing solar panels is one of the smartest financial decisions an Indian homeowner can make. With an ROI (Return on Investment) of just 3-4 years and a panel life of 25 years, it is essentially free electricity for two decades.
However, the process relies entirely on correct paperwork. By ensuring you have the latest electricity bill, a matching bank account, and a verified vendor, you can easily navigate how to apply for solar rooftop subsidy.
Don’t let the documentation scare you. The new digital portal is user-friendly, and if you follow this checklist, you will see that subsidy amount in your bank account sooner than you think. Start by checking your electricity bill name today—that is your first step toward a solar-powered future!
Frequently Asked Questions (FAQs) About Solar Rooftop Subsidy Process
Q1: Can I apply for the subsidy if I live in a rented house?
A: No. The subsidy is generally for property owners. The electricity connection must be in the applicant’s name, and you must have the authority to modify the roof. However, if you have a long-term lease and the landlord agrees to change the electricity bill to your name, it might be possible, but it is complicated.
Q2: How long does it take to get the subsidy money?
A: According to the current guidelines for the PM Surya Ghar scheme, once the Commissioning Certificate is generated and you have submitted your bank details, the subsidy is typically credited within 30 days.
Q3: Is the subsidy available for off-grid (battery) systems?
A: No. The Central Government subsidy (CFA) is strictly for On-Grid (Grid-Connected) solar systems. Off-grid systems with batteries are not eligible for this specific scheme, though some specific agricultural schemes (like PM-KUSUM) cover solar pumps.
Q4: Can I install the system myself to save money?
A: No. To claim the subsidy, the installation must be done by a vendor registered on the National Portal. Self-installation disqualifies you from receiving the government benefit.
Q5: What if my roof is shaded?
A: The DISCOM engineer will check this during the feasibility stage. If your roof has too much shadow (from trees or other buildings), they might reject the feasibility request because the system won’t generate enough power to be viable.
Q6: Are the documents required different for different states?
A: The core documents (Bill, Aadhaar, Bank proof) are the same across India for the Central Subsidy. However, if you are claiming an additional State Subsidy (available in some states), you might need to fill out one extra form or provide a domicile certificate depending on local rules.