Transitioning to solar power is a fantastic step toward energy independence and sustainability. A key part of realizing the full financial benefit of your new solar system is setting up Net Metering.If you’ve been asking, What is net metering?—it’s a crucial billing system that credits solar-powered homeowners for the excess electricity they generate and send back to the main power grid. Essentially, it allows your bi-directional utility meter to ‘run backward,’ offsetting your consumption and dramatically lowering your monthly electricity bills.
However, connecting your system to the grid requires navigating a formal application process with your local electricity distribution company (DISCOM) or utility provider. This guide breaks down the paperwork, processes, and steps you need to follow to ensure a smooth net metering.
What is Net Metering? A Quick Refresher
Before diving into the application, it’s vital to fully grasp the system you are applying for.
Net metering is a regulatory framework that facilitates the economic viability of small-scale renewable energy installations, primarily rooftop solar.
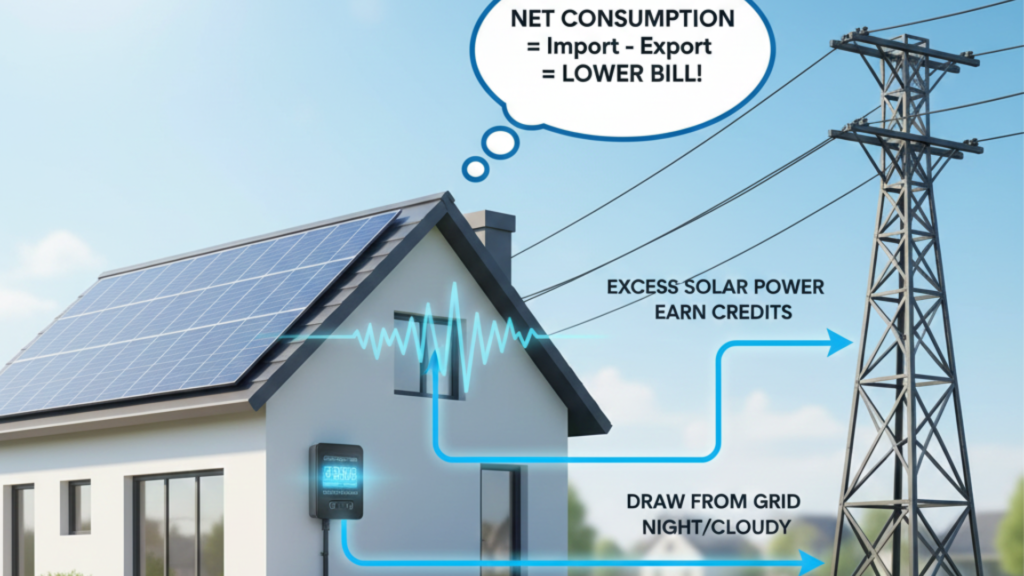
When your solar panels produce more electricity than your home consumes instantly, the surplus power is exported to the grid. The utility provider then gives you a credit for that energy. When your solar production is low (like at night or on cloudy days), you draw power from the grid as usual, but the credits earned earlier offset this usage. You are only billed for the “net” consumption—the difference between the energy imported and the energy exported over a billing cycle.
- The Key Component: A bi-directional meter (often called a Net Meter) is installed to accurately measure both the power you pull from the grid and the power you push into the grid.
5 Essential Steps in the Net Metering Application Process

While the specific names of forms and approval timelines may vary significantly by state and utility provider, the overall process generally follows these five sequential steps.
Step 1: Pre-Installation and Initial Application/Intent Submission
The first step often involves an application for technical feasibility before the solar system is fully installed. This is to ensure your proposed system size and connection point are safe and compatible with the local grid.
- Your Action:
- Contact your local DISCOM or use the National Portal (like the PM Surya Ghar National Portal in India) if available.
- Fill out the initial Application Form or Intent to Interconnect form, providing basic details like your consumer ID, sanctioned load, and the proposed capacity of your solar system (e.g., 5 kW).
- Pay the required application/processing fee, if applicable.
Step 2: Technical Feasibility (TF) Check and Approval
Once the application is submitted, the utility reviews the technical details, particularly for systems exceeding a certain capacity (e.g., above 10 kW).
- Utility Action: The DISCOM assesses the potential impact of your system on the local transformer and grid infrastructure.
- Your Action: Upon receiving Technical Feasibility Approval, you can confidently proceed with the physical installation of your solar system. Many homeowners hire an empanelled solar installer who manages this technical submission on their behalf.
Step 3: Installation and Final System Documentation
After approval, the solar installation is completed. This step requires gathering all technical specifications and compliance certificates.
- Installer Action: The solar installer provides the necessary technical drawings and test reports.
- Your Action: Ensure you receive the Installation Completion Certificate and all required documentation, which will be submitted for final approval.
Step 4: Submission of Final Documents and Inspection
This is the most paperwork-intensive phase. You submit the full suite of documents certifying the completed installation.
- Document Submission: Submit the final Net Metering Registration Form, along with the full technical and legal checklist (see Table 1).
- Site Inspection: The DISCOM schedules a Joint Inspection of your property to verify that the installed system matches the approved design and complies with all safety and technical standards (such as earthing, proper isolation devices, and component standards like IEC/BIS).
Step 5: Net Meter Installation and Commissioning
This is the final hurdle! Once the system passes the inspection, the utility moves to replace your existing meter.
- Utility Action: The DISCOM installs a new, bi-directional Net Meter at your premises.
- Final Step: You sign the Net Metering Interconnection Agreement (sometimes called a Power Purchase Agreement or PPA). Once this is done, the system is officially commissioned, and you are authorized to start exporting power to the grid and receiving credits.
Table 1: Essential Net Metering Application Paperwork Checklist

Having a complete and accurate set of documents is the number one factor in speeding up your net metering approval. This checklist covers the documents commonly required by utility providers.
| S. No. | Document Type | Purpose and Detail |
| 1. | Application Form | The official form (Intent or Registration) provided by the DISCOM/Utility. Must be signed by the Registered Consumer. |
| 2. | Latest Electricity Bill | A copy of the last paid bill to verify your existing Consumer ID (CA No.), sanctioned load, and billing address. |
| 3. | Proof of Identity (KYC) | Self-attested copy of your Aadhaar Card, PAN Card, Passport, or other government-issued ID. |
| 4. | Proof of Ownership/Occupancy | Sale Deed, Registered Lease Deed, or Allotment Letter for the premises. |
| 5. | NOC from Owner/Co-Owner (If applicable) | A No-Objection Certificate on a non-judicial stamp paper if the applicant is a tenant or co-owner, along with the owner’s ID proof. |
| 6. | Technical Details of the System | Detailed Single Line Diagram (SLD), specifications/datasheets of the Solar Panels and Inverter, and earthing details. |
| 7. | System Certificates | Test Certificates for the Inverter (e.g., IEC 61727, IEC 62116) and PV Modules (e.g., IEC 61215). |
| 8. | Installation Certificate | Certificate from your installer confirming compliance with local and national safety guidelines (e.g., MNRE guidelines). |
| 9. | Interconnection Agreement | The final legal agreement signed on stamp paper, governing the terms of grid connectivity and commercial settlement. |
The Critical Interconnection Agreement

The final step in the application is signing the Net Metering Interconnection Agreement. This is a legally binding contract between you (the Eligible Consumer) and the utility provider (the DISCOM). Understanding its key clauses is crucial.
Table 2: Key Clauses in a Net Metering Interconnection Agreement
This agreement formalizes the rules for power exchange, liability, and the commercial arrangement.
| Clause | Description | Why It Matters to the Homeowner |
| Term & Termination | Specifies the agreement’s duration (often 20-25 years) and conditions under which either party can terminate it. | Provides long-term assurance for your investment and credits. |
| Technical Compliance | Requires your solar system to meet all defined national/international standards (e.g., islanding protection, component standards). | Ensures your system is safe for the grid and compliant, preventing disconnection. |
| Commercial Settlement | Defines how and when the credits for exported energy are calculated and applied against your imported energy. | Dictates your energy savings and how you are compensated for surplus generation. |
| Access and Disconnection | Grants the utility the right to access the meter/disconnection switch for maintenance, testing, or in case of an emergency. | Essential for grid safety and maintenance, but ensures the utility can’t disconnect without cause. |
| Liability and Indemnity | Outlines which party is responsible for damages resulting from negligence or system failure. | Protects you from liability for grid issues outside your control and vice versa. |
Conclusion: Making the Connection to Net Metering
Applying for Net Metering is a procedural necessity, but it is one of the most rewarding steps on your solar journey. While the process of paperwork and approvals can feel lengthy—often taking anywhere from 30 to 90 days depending on your utility’s speed—the long-term financial benefits are immense.
By following this homeowner’s guide, preparing all the required documents beforehand, and ensuring your solar installer is coordinating effectively with your utility provider, you can navigate the application and process efficiently. The result is a fully commissioned solar system that turns your rooftop into a clean energy power plant, drastically cutting your electricity bills through the power of net metering.
Frequently Asked Questions (FAQs) about Net Metering
Q1: What is net metering exactly?
A: Net metering is a billing mechanism that allows consumers with renewable energy systems (like solar panels) to send any excess electricity they generate back to the utility grid. They receive a credit on their utility bill for this exported power, offsetting the cost of electricity they draw from the grid at other times. You are only billed for your net electricity consumption.
Q2: How long does the net metering application process typically take?
A: The total timeline varies significantly by utility and state policy, but typically ranges from 30 to 90 days from the initial application submission to the final meter installation and system commissioning. Delays often occur if paperwork is incomplete or if the utility needs time to schedule the final inspection.
Q3: Do I need a special meter for net metering?
A: Yes. You need a bi-directional meter (often called a net meter). Unlike a traditional meter that only tracks power imported from the grid, a bi-directional meter tracks both the electricity you import and the electricity your solar system exports. Your utility is responsible for installing this specific meter after your application is approved.
Q4: Can I apply for net metering myself, or should I use my solar installer?
A: While a homeowner can apply directly, it is highly recommended to use your empanelled solar installer. They have experience with the required technical documents (like the Single Line Diagram and component specifications) and are familiar with the specific procedures and contacts at the local DISCOM, which greatly simplifies and speeds up the process.